Monthly Archive: November 2013

Process Improvement via The Whiteboard Way© – Step Four

Using Return on Investment and Cost Benefit Analysis in Process Improvement

Step Four: Prove It!

prove itAs we continue along our process improvement journey we focus today on PROVE IT!

But first, a little recap.  So far we’ve taken you through the first three steps of The Whiteboard Way© (if you haven’t checked them out yet, here they are):

  1. Define it!
  2. Draw it!
  3. Imagine it!  

We’ve regaled you with:

  • how to remove assumptions and pre-conceived ideas about the solution,
  • to be unbiased and creative in the possible solution,
  • then how to map a process to visually identify opportunities for improvement, and
  • lastly how to imagine a potential solution.

And now the rubber hits the road – we need to do some math to determine if your solution will work! Our first  task to to collect some data!

Collect the Data

We love to plan here at Whiteboard, and while often we want to jump the gun and just start collecting everything we can find, a great start is a data collection plan.  It helps organize data collection activities and makes sure everyone involved with it understands the goals and objectives to provide the best data possible.

Consider asking the following (to yourself ,your project team, and your stakeholders):

prove it 2

  • What data is needed?
  • Who is responsible for getting it? Why is it needed ?
  • How will it be collected?
  • When will it be collected?
  • Where will it be collected?

Cost Benefit Analysis

One of the biggest complaints we hear from teams and their management when we go to implement cost improvement activities are things like:

“We always try to tell management about these ideas, but they just ignore us!”

“Our teams have all these ideas, but they can never tell me why we should spend that much money on them!”

One of the reasons that great ideas often don’t fly is that they are missing rationale.   Everyone can tout the benefits of process improvement initiatives, but its a skill to be able to  articulate why the costs and efforts to implement  are worth it.  A cost/benefit analysis is a structured process for determining the trade-off between implementation costs and anticipated benefits of potential improvements. The analysis is done to ensure that a particular improvement is the most efficient one in a set of potential alternatives.

What is ROI?

roi


Return on Investment (ROI) is the difference between the gain from investment and cost of investment divided by the cost of investment. ROI considers hard costs and savings (actual reductions in costs to the organization). The business case to prove your solution should also talk about soft costs and soft savings (other organizational benefits like employee engagement that don’t have dollar values associated with them).


ROI= (Gain from investment – Cost of investment)/cost of investment

  So remember to consider the following when completing your cost/benefit analysis:

  1. All the costs associated with implementing the improvement
  2. Capital investment
  3. People costs (consultants, staff time)
  4. Training
  5. Lost production
  6. Determine the benefits of a fully-implemented improvement
  7. Calculate Return on Investment
  8. Keep it simple!

You might have come up with the best idea since sliced bread, but unless you talk about it, share it and explain it to others, it won’t happen! Stay tuned for our next blog on Talk About it! – how to communicate your process improvement idea!

Until then, please leave a comment – anything! Process questions, ideas for an upcoming blog, your thoughts on Toronto’s classy mayor…

Nicole

Process Improvement via The Whiteboard Way© – Step Three

This week we continue our series on The Whiteboard Way© by taking you through what just might be the “favourite” phase in the process improvement journey – “Imagine It!”

Why is it the favourite phase? Well, it’s because most people have a solution in mind when they start this journey, and up until now we haven’t allowed them to even suggest it. We were all about  problem definition in Step One (remember, no solutions) and then the visual representation by drawing the current state in Step Two. In the third phase, we finally get down to business and talk about some possible ways to fix the problem.

Finally! I Can Just Implement My Idea, Right?

Um, no. Sorry. There are a few things we need to do to make sure that your idea not only will fix the problem, but that it’s also the best place to start. Sometimes great ideas are trumped by new ideas that we find in the first few steps of Step Three. If you can hang in a little longer, what we want to do next is brainstorm all the possible causes for the problem you designed in Step One, and drew in Step Two.

We’ve been looking at three different problem statements in this series:

  •  In the last 3 months we have had to fix this issue 6 times for four customers, causing dissatisfaction for our customers and wasted processing time for our staff.
  •  Each month we are 5-7 days late completing this process, impacting other departments and generating late fees for the company.
  •  This piece of work costs the organization $5,000 per month. Best practices in similar companies is half that amount.

Let’s take a closer look at the first example. It seems that we’ve sent the wrong thing to our customers 3 times in 6 months. Our shipping manager is pretty sure that it’s because we hired 4 new people in the warehouse, and they’re just not using the shipping system properly. He’d like to do some training for them – it will cost $1,500 a person to attend a two day course, and will require hiring temps to backfill while they’re off at training.

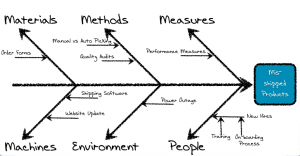
In “Imagine It”, the first thing we have to do is think of all the potential reasons for the mis-shipped products. We love to use a tool called a Fishbone Diagram to help people come up with “root causes” for the problem. This diagram is best drawn on a big whiteboard or brown roll-paper on the wall. At the head of the fishbone you put the problem “Mis-shipped products”. Each of the bones in the spine represents a common category of root causes. These categories are designed to trigger thoughts while brainstorming – participants use them to think of all the things in that category that could possibly impact the outcome.

A completed Fishbone Diagram for this issue might look like this.

Screen Shot 2013-11-09 at 6.32.38 PM

Actually, it would probably look much messier and with dozens more ideas. But let’s run with this one.

Our shipping manager’s idea of training being the big concern is right there on the fishbone, under the “People” category. But during the brainstorming session, someone pointed out that there have been a few power outages recently and that all the picking had to be done manually. Also that the website had been updated, and that customers in Vancouver had called in with issues using the online order forms.

Suddenly, the training idea has taken a back burner until the other ideas are investigated. It doesn’t mean it’s a bad idea, or even the wrong idea – it’s just that a little more investigation is needed first.

In this case, it turns out that the power outage was the root cause – each mis-shipment was linked directly to times when the picking process had to be done manually.

Now What?

A few things. First, you might want to investigate why you’re having so many power outages! Is it a freak of nature or do you have electrical issues? Second, how can you improve the manual picking process? Use your new process mapping skills to look at the current process and see where there might be room for improvement and ways to prevent mistakes from happening (the Japanese term for this is Poke Yoke – error proofing).

You might want to prove that the new process will work too. That’s the topic for next week.

Until then, please leave a comment – anything! Process questions, ideas for an upcoming blog, your thoughts on the Maple Leaf’s’ chances this year. Whatever!

Ruth.