Last week Ruth started a series on The Whiteboard Way©, our very own process improvement methodology (this proved to be advantageous for me, as I was at a creative standstill with blog ideas. Thanks Ruth!)
First, a Little Background
A little recap – last week Ruth talked about the most critical step in The Whiteboard Way© – Define it! By removing assumptions and pre-conceived ideas about the solution, it allows you to be unbiased and creative in the possible solution.Today I’m going to delve into my love-hate relationship with process mapping.
Why do we process map?
Approximately 65 percent of the population are visual learners and people process visual information much faster. Visually representing a process allows you to see things that may not necessarily jump out at you when you read a procedures document or when you just “imagine” the process in your head. Here are some things that jump out at you when you process map:
- Touch points. How many people, teams, departments must a product or service pass through to reach the customer? The higher the number of touch points in the process the longer the process will take, and the higher likelihood that a defect (or error) will occur.
- Duplication. Process maps are great at visually highlighting work that is duplicated across the company by different teams. With our clients, we usually see a map highlight, for example, people that enter the same data into different databases, or forms in different areas of the organization.
- Bottlenecks. Bottlenecks occur when there is a blockage in the flow of information or work. For example, when a busy executive is holding an approval at their desk for days upon end.
So Ruth helped you develop your problem here. Some examples of “Good” Problem Definitions are below:
- In the last 3 months we have had to fix this issue 6 times for four customers, causing dissatisfaction for our customers and wasted processing time for our staff.
- Each month we are 5-7 days late completing this process, impacting other departments and generating late fees for the company.
- This piece of work costs the organization $5,000 per month. Best practices in similar companies is half that amount.

Step Two: Draw It!
So now, take your “good” problem definition from last week , and think about the process(es) that contribute to it. There are many types of process maps out there, each serving a different purpose. We like to use the swim lane process map because it allows you to identify the ‘hand offs’ or touch points in the process. At this point you are mapping the As-is current state process, not the Should-be (in an ideal world), or Thought-to-be (what we think it looks like). Get everyone in the room who touches that process and talk about what “ACTUALLY” happens.
There are four steps you need to remember when mapping a process.
- Determine level of detail. A high level view of your process will require 3- 5 process steps, while a more detailed view can have up to 20 process steps.
- Lay out your swim lanes. Identify how many people, positions, teams or departments are involved in the process (keep in mind the level of detail you have chosen to map it) . Create a swim lane for each. Your process should flow from the top to the bottom, left to right. So if your administrative assistant or your client starts off the process, their lane should be placed at the top. The same, if your shipping department is the last to finish the process, their lane should be placed at the bottom.
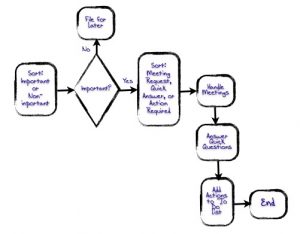
- Use your Shapes. The are 4 key shapes to use when mapping. The oval represents the start and the end of your process. The rectangle represents your process step. The diamond represents your decision point. The arrows represent direction and connection. The diamond is the fork in the process and therefore will always two arrows, a Yes and No.
- Number your Steps. Although the arrows help with direction, sometimes with complicated processes, you lose track of the flow, especially if there are a lot of decision point. For this reason it is important to number your process steps.
So get out your whiteboards, sticky notes, and markers, and start to Draw It! Let us know what you find out!
Leave us a comment below!
Until next week,
Nicole


 So you’ve decided you need a consultant, right? No? Not sure?